After writing about a few of his releases in the past and meeting Petridisch at 100% Electronicon 1, we’ve become quite good friends. I noticed he started releasing a lot of MiniDiscs lately on his experimental label, Fish Prints. So I asked him how he did it and he gave us an amazing write up on how to create homemade MiniDiscs
FISH PRINTS GUIDE TO CREATING HANDMADE MINIDISCS
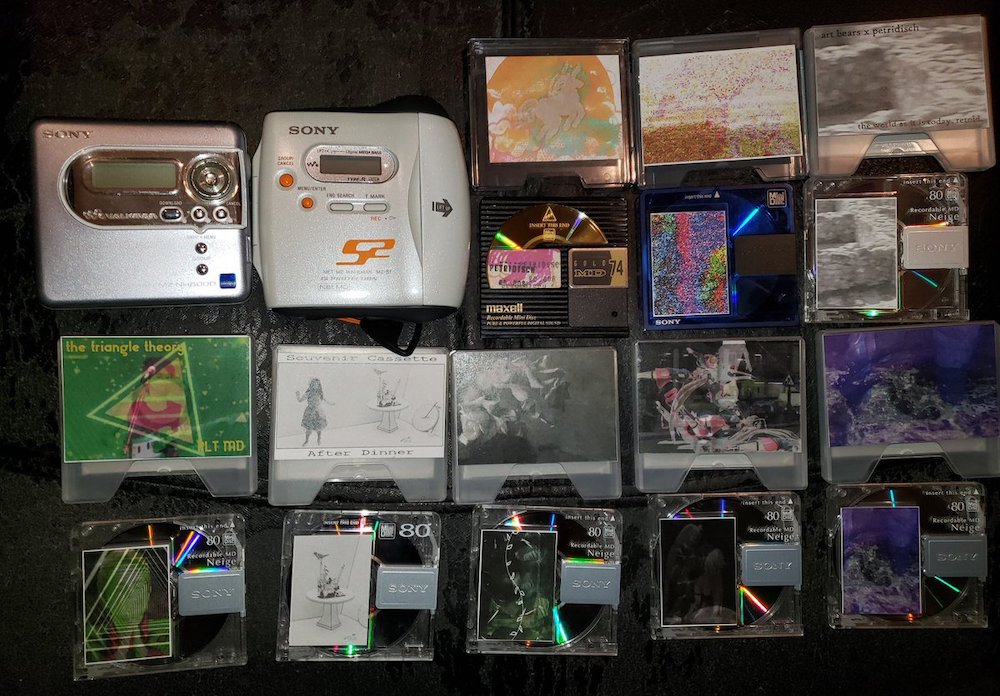
Hey hey! To be quite honest, it was the release of a friend’s minidisc back in 2018 (キラヨシ’s “Reincarnated Resurrection”) that prompted me to buy a handheld MD recorder/player once again after owning various deck units in college, where I used the MD format to mostly make ‘bumpers’ for my radio show at the time. I looked back at creating my own MDs very fondly, and upon receiving my friend’s album, and saw that it was “just handmade” on Memorex 74 minute blanks, so I wondered “hey, could I plug this recorder/player into my laptop and burn minidiscs if I found them?” and that got me started in making MiniDiscs for my label, Fish Prints.
After some research, I found a YouTube tutorial on the very subject: How to Burn to MD with Windows 10 (This contained the necessary drivers – a tremendous “thank you” to Gear Seekers). I had to watch it a few times myself, but I’ll try to simplify what I found out in that video, though I highly recommend viewing that in conjunction to this outline as it gets into very technical detail as to how to get your machine to ‘recognize’ it all.
I’ll also briefly get into the ‘print’ process and presentation of Fish Prints Handmade MD material.
Why MiniDiscs?
Why MD? Aside from a strong personal nostalgia, indeed, why? It all depends on whether you believe in different file encoding processes truly having the potential to sound ‘different’. MD (aside from Hi-MD which uses PCM 16/44.1 audio) at the very best is encoded in SP mode, which applies the proprietary Sony MD compression, ATRAC. Some believe ATRAC sounds markedly better than any MP3. I have to say to my ears at least it does sound ‘different’ than MP3, different enough to warrant its existence :)) Plus, again, I just ADORE the format
Tutorial
What you’ll need
- A minidisc (MD) recorder (most small “Walkman” models are also recorders) with NetMD capability – and a compatible USB cable (similar to PlayStation 3 controller cables)
- VMWare or a similar Virtual Machine/hypervisor program running Windows XP
- Sony SonicStage software
- The NetMD drivers for Windows 10 or your OS
- A minidisc 🙂
This tutorial does require a Virtual Machine of Windows XP or Windows XP in some manor, for a tutorial on that check out this page.
Which MDs to buy?
As far as BUYING MDs for “STOCK” I do go the expensive, new route (about $5 per disc from where I get them) but it does make for a little bit of a better looking product. I am not against repurposing discs though – as long as the packaging is rad and they are encoded well! Clean cases and MDs though I find important, people like clean product 🙂
How to make Custom packaging on MiniDisc
Packaging went for Fish Prints Handmade versions: I simply measured the cases for templates of ‘sticker covers’, design those in Photoshop at a printable resolution (lowest 300dpi), and print them at the local shop on label paper. Cut cut, stick stick. Then of course, the hand numbering! Voila! Fish Prints Handmade (hahah)
The beginning of the MD story for me wasn’t as ‘clean’ as the latest release! The first MD Fish Prints ever did, my own Hit Rendition in cooperation with Grimalkin Records, was a handmade in all ways affair – actually went out to the art shop and bought stamp pads and rubber stamps and weird stickers for that one! It has a charm that I was and am real pleased with. I’m real proud of the more streamlined process the MD making has these days
Installing NetMD Drivers
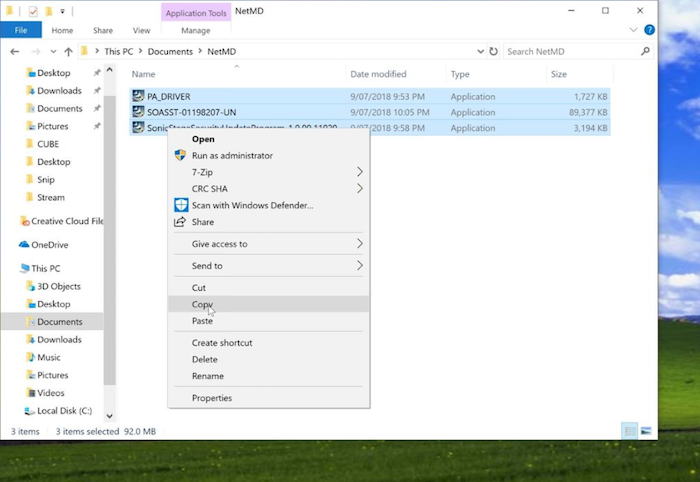
Go to where you have the three NetMD XP drivers installed on your system, and copy and paste onto the virtual desktop.
IMPORTANT to complete this order
- Install the PA_DRIVER first
- Next on the list is the proprietary burning software, SonicStage. This file starts with “SOASST”
- Install this next, this one will require a “virtual system reboot”.
- Last to install is the SonicStage Security Update
- Once this is done, OPEN SONICSTAGE
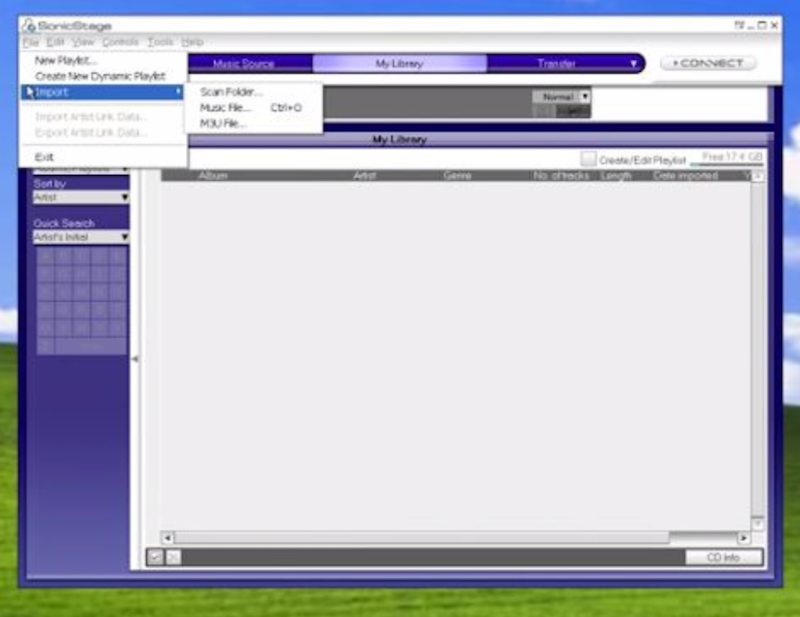
Open the “File” menu, go to “Import” and then “Scan Folder”
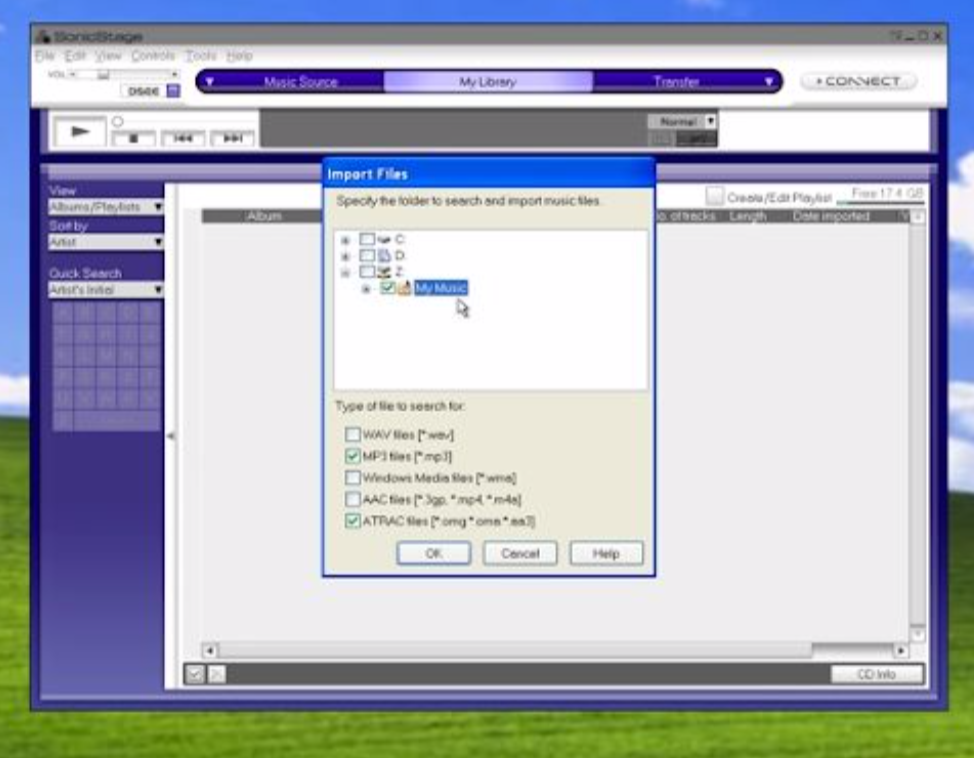
UNCLICK THE C DRIVE HERE. It will cause you problems later. The “Z” drive, and more specifically, your folder of music, is what you want checked.
Click on the file types you’ll want to import and then hit “OK”
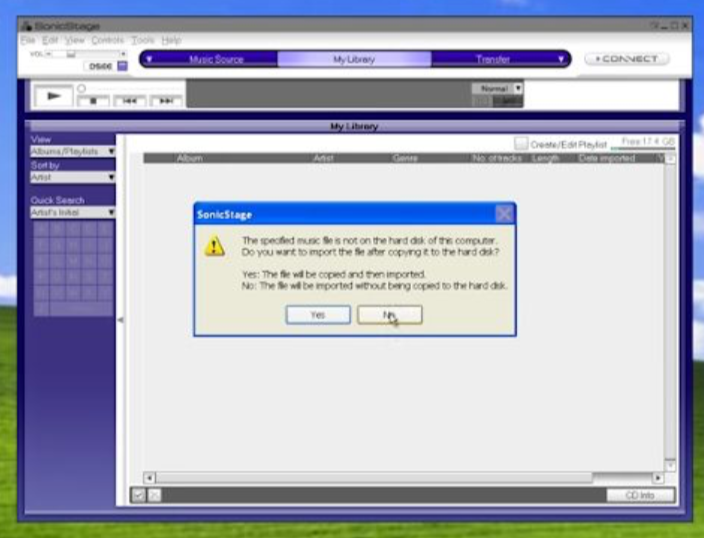
- At this prompt, hit ‘NO’.
- Then your files will import into the VM without being weirdly re-processed! NOW IS THE TIME….
Connecting MD Player to PC
Take your minidisc. Insert it into your NetMD player. (Use your Playstation 3 style USB cable to plug the player into your computer.)
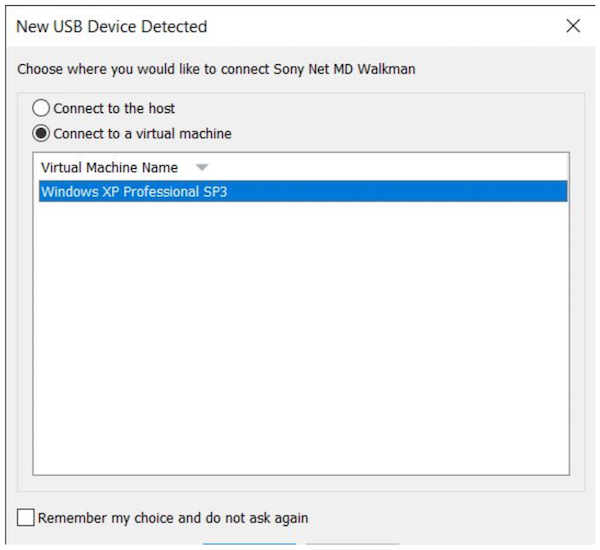
You’ll get this prompt. Select “Connect to a virtual machine.” if using VMWare, else you’ll need to connect to your own Virtual Machine.
Formatting used MiniDiscs
So, to erase the disc, hit the button “Device/Media Info” in the lower right of SonicStage.
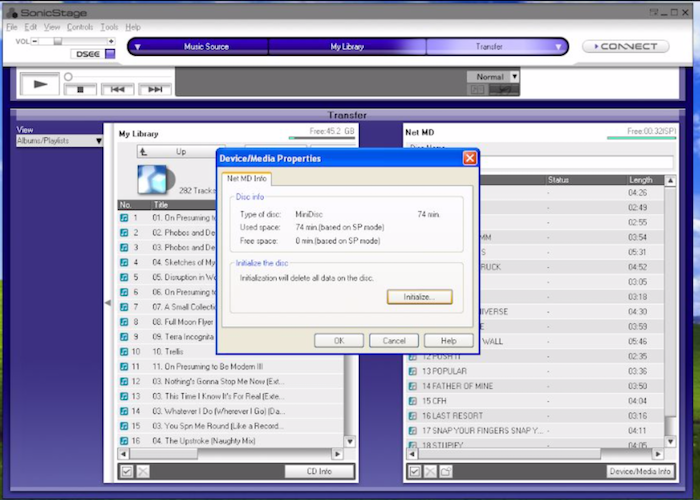
- Hit “Initialize”.
- It will ask you if you REALLY REALLY want to do it, you do.
- Let it erase the contents and there you have a disc ready for writing!
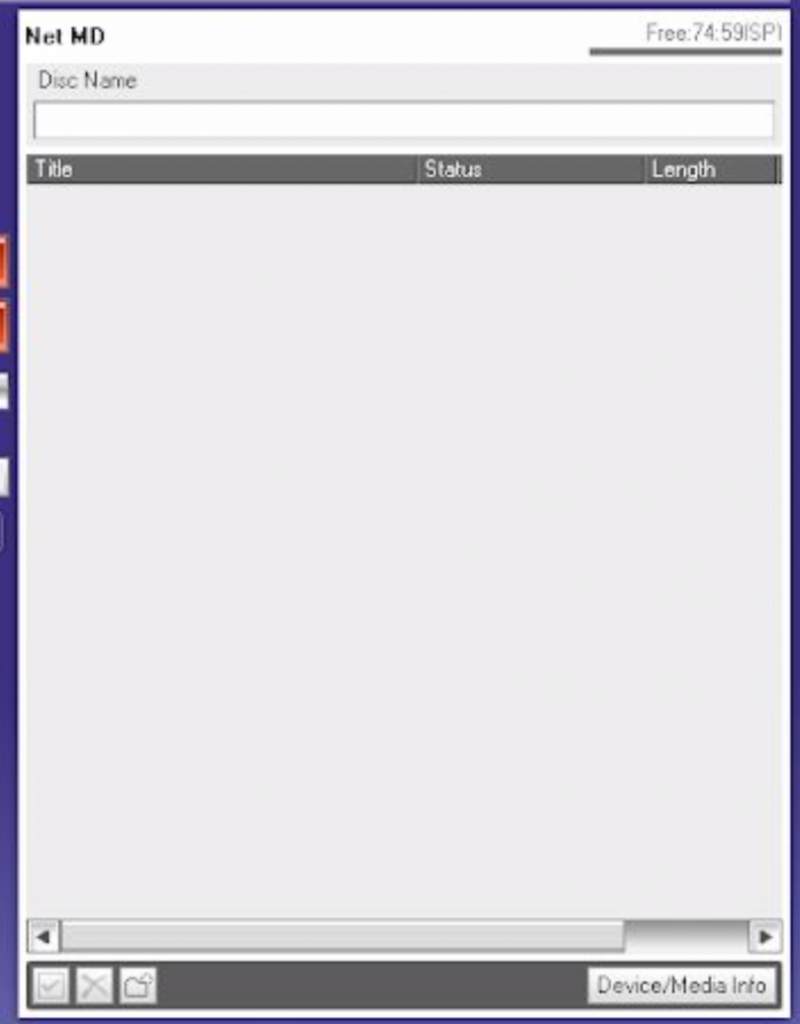
Congrats, You’ll now see your miniDisc is empty.
Writing music to MiniDisc
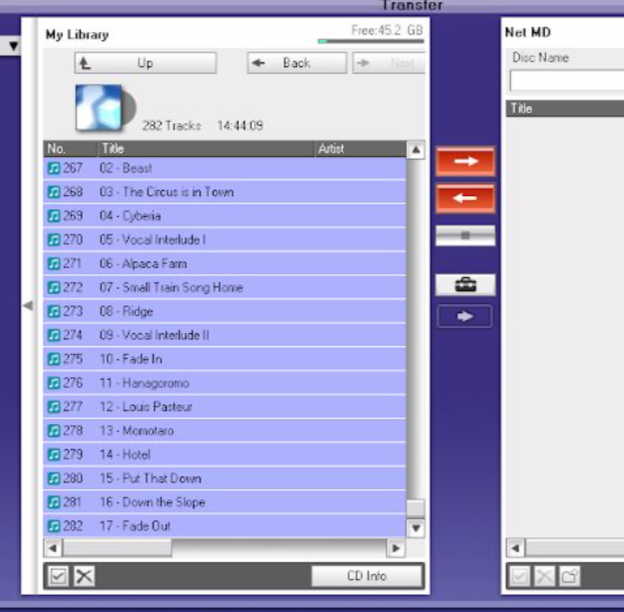
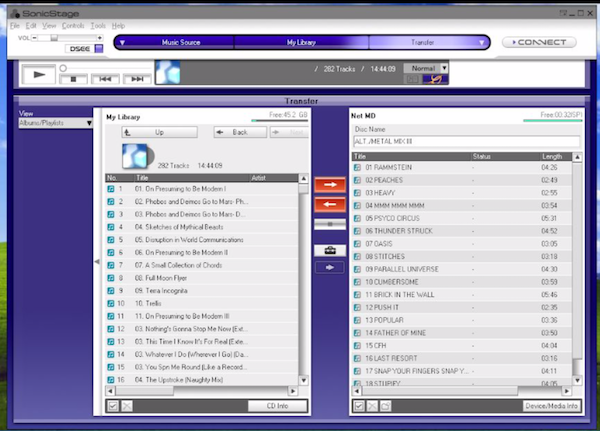
Next, highlight the song (or songs) in the left menu that you want written to the disc.
[For audio nerds like myself: at THIS point you may want to choose between compression/transfer options]
Optional: compression/transfer options
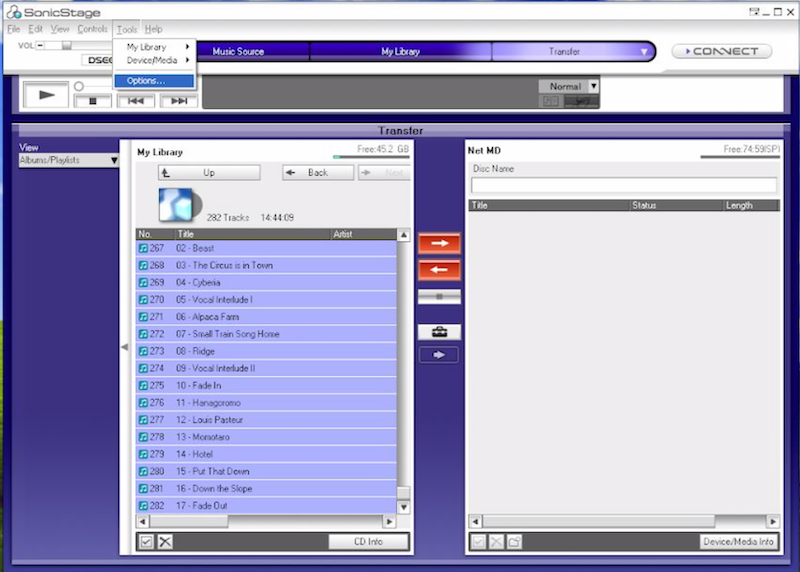
Go to the “Tools” menu in the upper left of the program, click “Options”
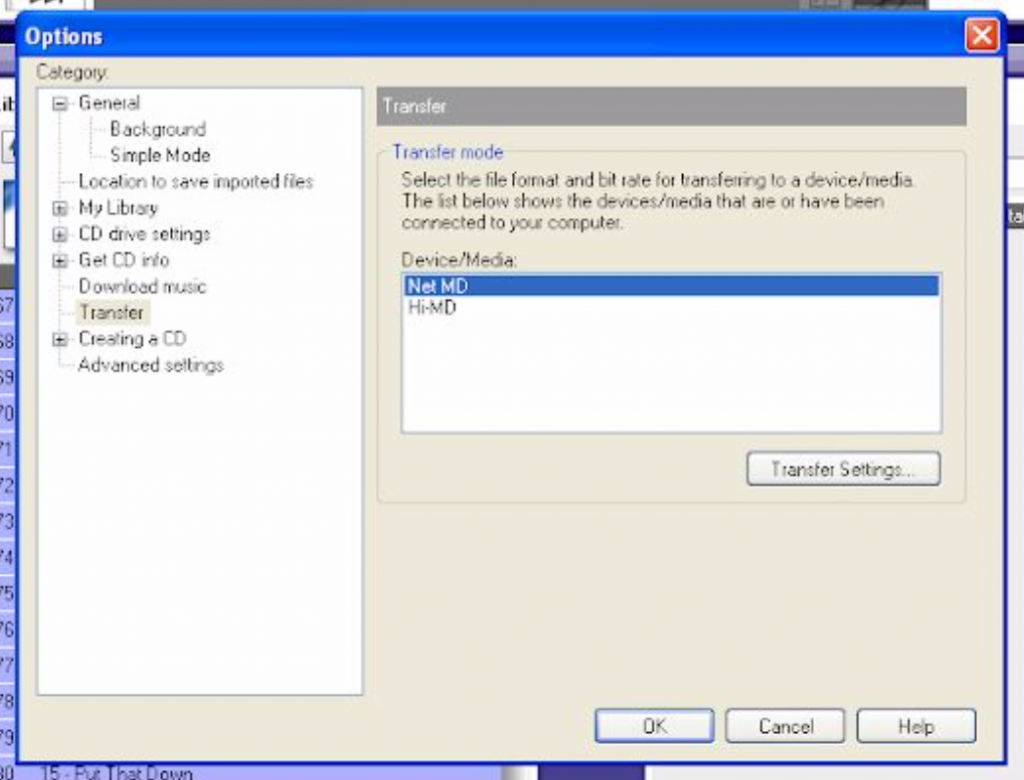
Go to “Transfer” and select “Net MD” (you *probably* won’t need to adjust Hi-MD settings unless of course you are transferring to specifically Hi-MD to a Hi-MD player!)
Hit “Transfer Settings”

As you can see there are three modes:
- Standard transfer mode – states no conversion but all files have ATRAC applied to them when written to MD (save Hi-MD cases), but written with NetMD so while it writes faster it’s a bit like a high-end MP3 sound-wise. Not true SP.
- Specified bit-rate transfer mode – a lot like 256 vs 192 kbps MP3. LP2 is better than LP4.
- SP transfer mode – my personal preference as it truly burns the discs in STANDARD PLAY mode and “90’s gapless” 🙂
[End audiophile section]
Transferring music
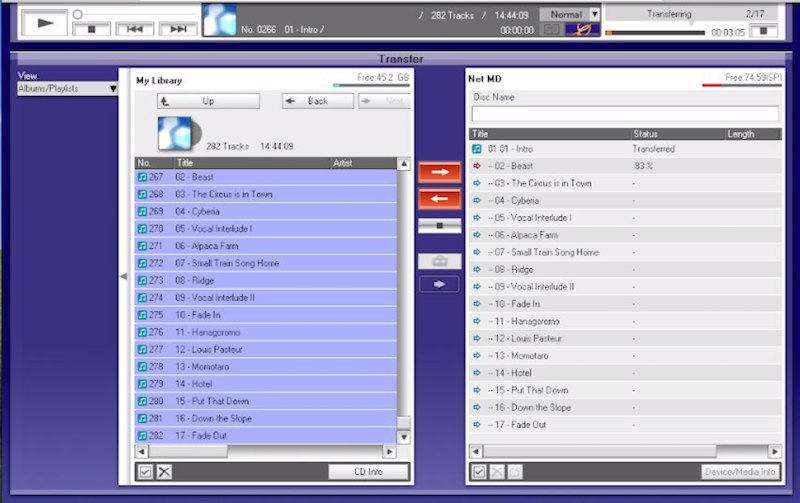
- NOW you can drag the files highlighted over to the right side, where the disc contents are, and DROP!
- You will see the files start to convert and transfer!
Once the process is complete, you will hear a little jingle jangle and you will see something that looks a bit “final” like this. You can also type in a name for it!
Congratulations, we have our first burned playable minidisc!
Now words from KITE0080: I want to thank Petridisch from Fish Prints for this great write up. I’ve been looking into writing my own minidisc’s for the Patron supporters, so I wanted learn and asked him for this write up. I hope this interests other fans of the format to make their own little mixes. If you like MiniDiscs, check out Fish Prints as they seem to release MiniDiscs quite often. Thanks again for this guest post.
One thought on “Tutorial: How to transfer MP3 to MiniDisc”
Comments are closed.